Installing NPM (Node Package Manager) and Node.Js is important for JavaScript improvement due to their pivotal roles in dealing with dependencies, executing server-aspect code, and facilitating the introduction of sturdy, scalable packages.
Node.js, a runtime environs reinforced on the Chrome V8 JavaScript engine, enables developers to run JavaScript code exterior the browser, enable server-side scripting, and make entanglement applications. This enables developers to use JavaScript to create more efficient and effective networks such as APIs, and web servers that allow you to build applications. It has become a really popular choice for building high-grading applications and servers in real time.
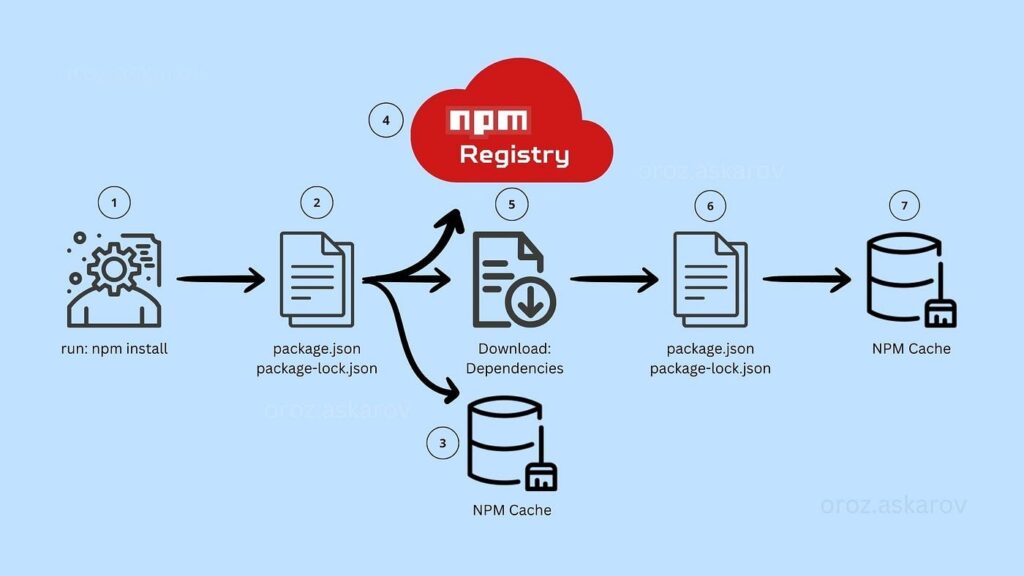
NPM, included with the Node.js installation acts as a comprehensive package manager for JavaScript libraries and tools, simplifies the process of adding third-party packages to projects, manages dependencies, it automates common tasks. The great thing about this model is that it saves time and effort in building applications. In short, it’s more like a collection of LEGO pieces that you can use to build a building without having to start from scratch every time.
Node.Js and NPM form the backbone of modern-day JavaScript development, supplying a rich ecosystem of gear and libraries that boom overall performance and enable developers to build state-of-the-art packages across more than one domains
In today’s guide, we will shed some light on the best and most effective practices on how to install Node.JS and NPM on Windows and MAC with detailed steps.
Topics we have covered in this blog:
- Importance of NPM?
- Importance of NodeJS?
- Installation Requirements
- Installing Node.js and NPM on Windows
- Installing Node.js and NPM on Mac
- Key Pointers to Consider
- Conclusion
What is the Importance of NPM?
A treasure chest that is full of tools and options for JavaScript developers. It plays a pivotal role in the world of JavaScript as it helps create ready-made code from tiny helpers and big frameworks. NPM saves a lot of time and effort during the creation of building websites and applications. It has become a beacon of hope for developers as it allows them to quickly add features, fix minor bugs, and improve their projects with just a single tap.
Building Blocks of NPM
- Registry: A vast dimension of the library where the JavaScript codes (packages) are stored. To make your project a successful one, you can find all sorts of codes in one place.
- Command Line Interface (CLI): Perhaps, a great function that allows you to spin the magic wand and perform any tasks without difficulties. You can ask NPM to do things like “install” or “publish”. You can add new codes to your project or share codes with others.
- json: The job of such components is to tell NPM what your project needs to work correctly, like which packages it depends on and what scripts to run.
- Package Lock File: Everything remains consistent as it works as a checklist that NPM uses to ensure that every project always works accurately. It keeps track of exactly which versions of each package your project is using
- Node Modules: This is where NPM puts all the pieces of code (packages) you’ve asked for. It’s like a toolbox full of tools you can use to build your project.
What is the Importance of Node.JS?
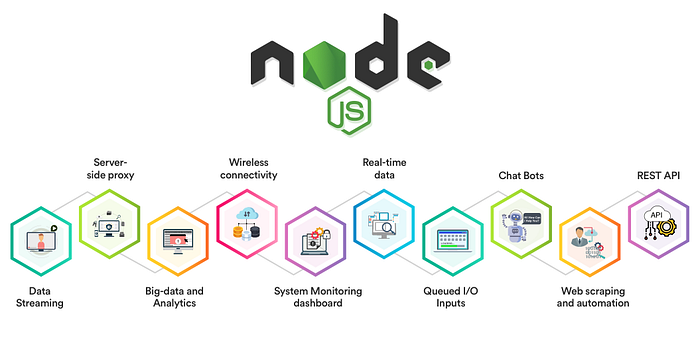
An easy way to create websites and applications is achieved through Node.JS. It makes things simpler as developers can stick with one language for both front-end and back-end. It is certainly a fast-functioning tool that can manage multiple requests at once. It is crucial for websites whose task is to handle user traffic at the same time. The traffic that is usually can be witnessed in social media sites and online stores. To sum it up, Node.js makes the process of building robust and fast websites seamless.
Since Node.js architecture supports a “Single Threaded Event Loop”, NodeJS manages multiple concurrent clients at the same time. The Node.js processing model is built on the JavaScript event-based model, as well as the JavaScript callback mechanism.
To find the accurate guidelines you can reach out to Github/Node.Js and find further information on their account.
Features and Functionalities of Node.JS:
- V8 Engine: The core of Node.js, V8 is an open-source JavaScript engine developed by Google, responsible for executing JavaScript code.
- Libuv Library: This library provides event loop, asynchronous I/O, and other essential features to Node.js, allowing it to handle concurrent operations efficiently.
- Core Modules: js comes with built-in modules that provide essential functionalities like file system operations, networking, and stream handling, making them readily available for developers to use.
- CLI (Command Line Interface): js provides a command-line interface that allows website developers new york to interact with the Node.js environment, execute scripts, and run applications.
Installation Requirements:
Here’s what you need to go ahead with Node.JS and NPM.
Hardware Requirements
- RAM 4GB
- CPU Intel Core i3TM i3 HQ CPU @2.50 GHz
- ROM 256 GB
Software Requirement
How to Install Node.js and NPM on Windows?
Although installing may appear challenging, we’ve offered a useful installation method in this blog. We have included a detailed installation instruction for Node.JS and NPM for Windows below, complete with screenshots.
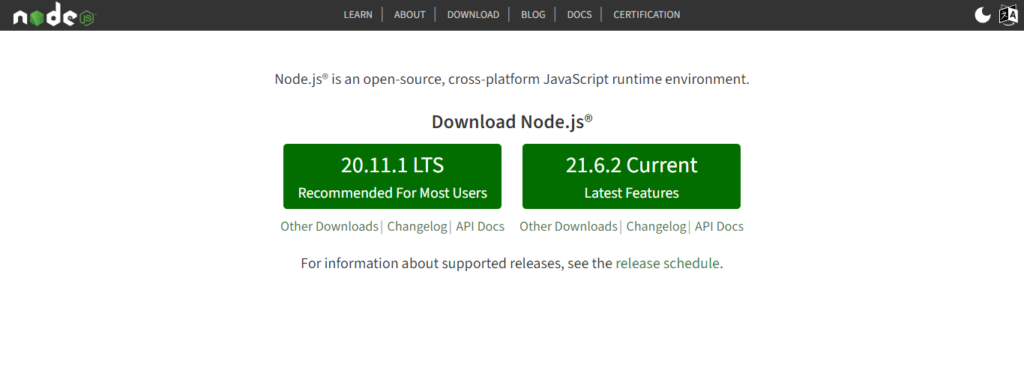
Step 1: Download the Installer
Visit the official Node.js website and download the Windows installer (.msi file) for the LTS (Long-Term Support) version.
LTS versions are recommended for most users as they are more stable.
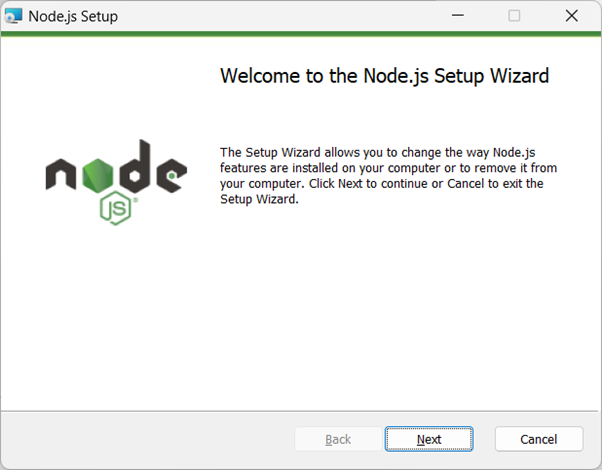
Step 2: Run the Installer
After downloading the installer, double-click the. Psi file to induction it. You may have needed to sustain any credentials data from Windows User Account Control.
Follow the readiness wizard; The Node.js readiness super walked you finished the readiness process. Click Next to continue.
Accept the License Agreement; Read the License Agreement, and if you agree with the terms, check next.
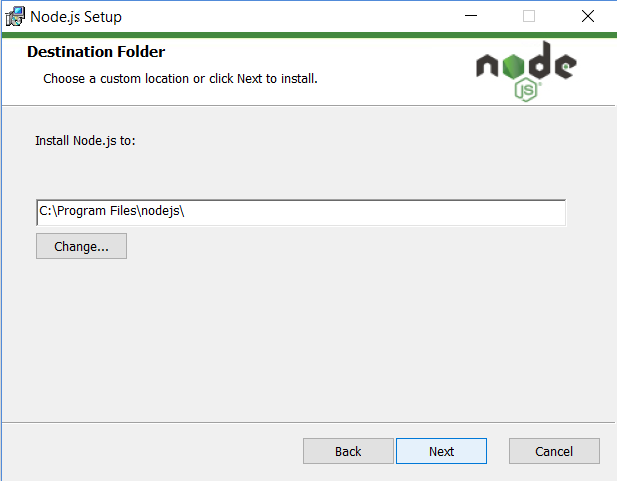
Step 3: Choose Installation Location
By default, Node.Js could be installed inside the “Program Files” listing to your machine force. You can choose a distinctive place if needed, or simply click on “Next” to accept the default.
Select the components: By default, each of the Node.Js runtime and NPM may be mounted. Make certain both test bins are selected and click on “Next“.
Select Start Menu Folder: You can specify a folder in which shortcuts for Node.Js and NPM are positioned inside the Start menu. Click “Next” to retain.
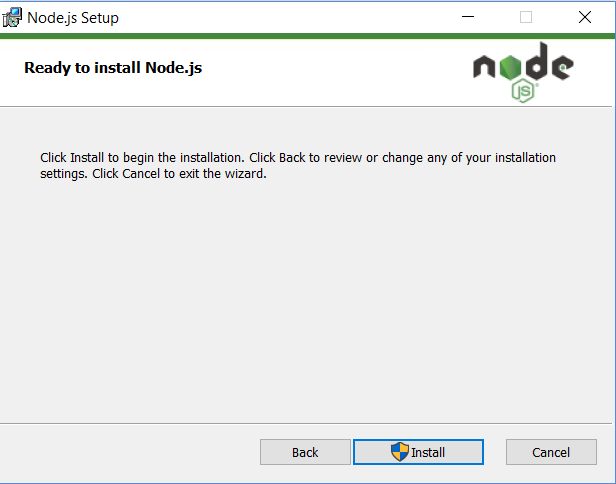
Step 4: Finalizing Process
Review the setup settings and click “Install” to start the installation method.
Wait for Installation: The installer will copy files and configure Node.Js and NPM in your gadget. This might also take a couple of minutes to complete.
Installation Complete: Once the installation is finished, you may see a “Completed” message. Click “Finish” to close the installer.
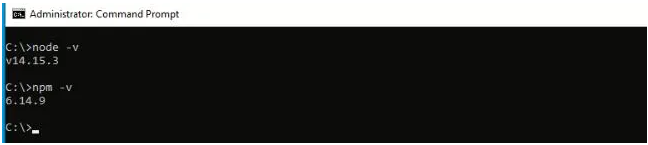
Step 5: Verify the Installation
To check that Node.js and NPM were installed correctly, open the control panel search “cm” in the Start menu, and type the following command:
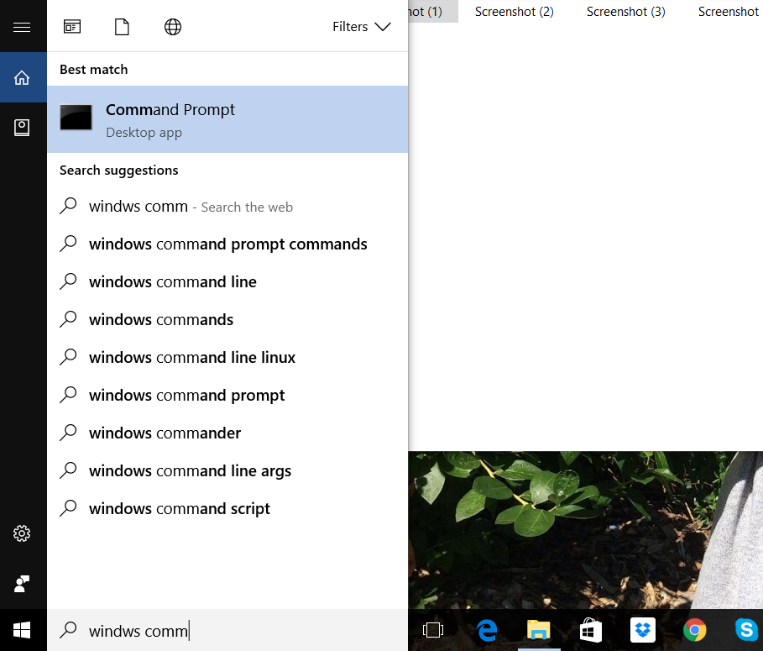

- To confirm Node installation, type node -v command.
- To confirm NPM installation, type npm -v command.
These commands displayed the versions of Node.js and NPM installed on your system, respectively.
How to Install Node.js and NPM on Mac?
Installing NPM with Node.JS is comparable to Windows installation in certain ways. To make the procedure easier for you to grasp, we have provided a step-by-step instruction.
Step 1: Download the .pkg Installer
Click on the “macOS Installer” option to download the .pkg installer. Make sure you download it to your desired location.
Step 2: Run Node.js Installer
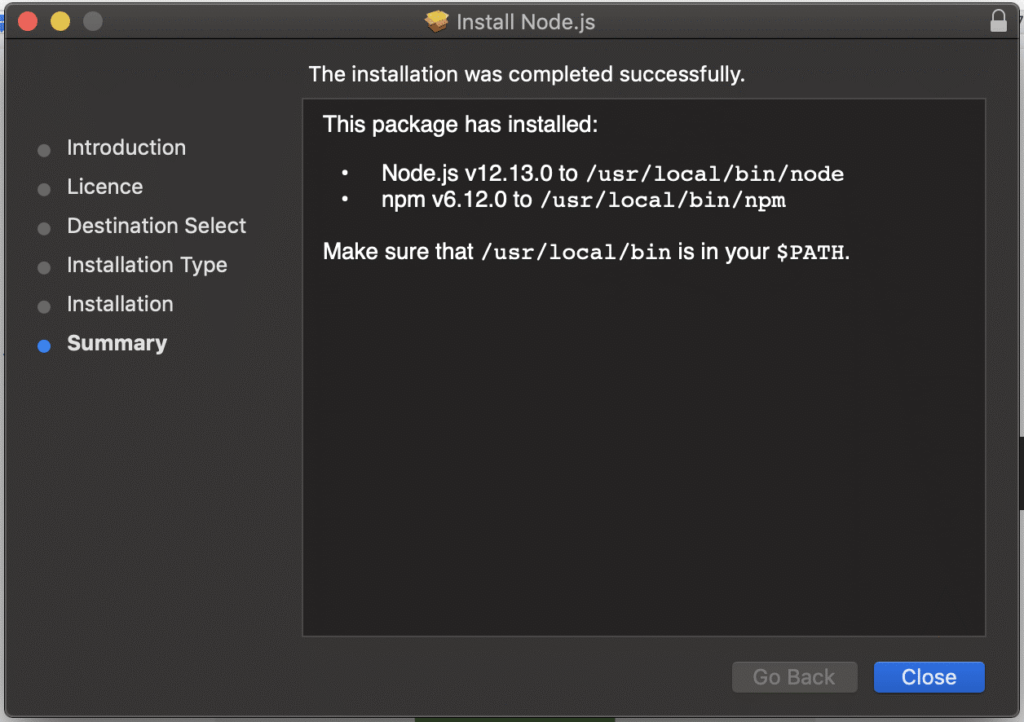
Your installer is now prepared to launch. That won’t take you long, though. So let’s go over this in more depth.
Overview > Continue License by selecting Continue > Select the Installation Type > Install > Verify your Mac’s identity to approve the installation > Install Software Overview > Close
Step 3: Verify Node.js Installation
Use the following command in your terminal to see if you have installed Node.js correctly on your macOS:
Node -v node -v // the command we ran - tests the version of Node.js that's currently installed v12.13.0 // the version of Node.js that's installed. It can be some other version.
Step 4: Update Your NPM Version
The NPM version is not automatically updated by Node.js.
You can upgrade your NPM version by writing the supplied command.
$ sudo npm install npm --global // Update thenpmCLI client
There You Go! Node.js is there on your Mac system. Interesting, right? Let’s explore it further.
How to Install Node Using “Homebrew”?
Here’s how you can install Node.js and NPM using Homebrew:
Step 1
Install Homebrew: If you have not already installed Homebrew, you can do so employing establishing a Terminal and the following command:
/bin/bash -c "$(curl -fsSL https://raw.githubusercontent.com/Homebrew/install/HEAD/install.sh)"
Step 2
Install Node.js and NPM: Once Homebrew is established, you can use it to install Node.Js and NPM with the aid of jogging the following command in Terminal:
brew install node
Step 3
Verify Installation: After the setup is entire, you can affirm that Node.Js and NPM have been established
efficaciously via strolling the subsequent instructions in Terminal:
node -v npm -v
These instructions will show the variations of Node.Js and NPM installed on your Mac, respectively.
How to Install Node Using NVM – Node Version Manager?
To set up Node.Js using NVM (Node Version Manager) on your Mac, observe the steps:
Step 1:
- Install NVM: Open Terminal, and paste the following command to download and install NVM:
bash
Curl -o- https://raw.githubusercontent.com/nvm-sh/nvm/v0.39.1/install.sh | bash
This command downloads the NVM set up script from GitHub and runs it, including NVM to your shell profile (e.g., ~/.bash_profile, ~/.zshrc, or ~/.profile).
Step 2:
- Close and Reopen Terminal: After installing NVM, close the current Terminal window and open a new one. This ensures that the changes made to your shell profile are applied.
Step 3:
- Verify NVM Installation: To verify that NVM was installed successfully, you can run the following command in Terminal:
Cs
Nvm --version
This command should display the model of NVM mounted on your screen.
Step 4:
- Install Node.js: Once NVM is installed, you can use it to install Node.js. First, check the available versions of Node.js by running:
Nvm Is-remote
This command lists all the versions of Node.js that are available for installation via NVM.
Step 5:
- Choose Node.js Version: Decide which version of Node.js you want to install, and then use NVM to install it. For example, to install the latest LTS version, you can run:
Css
nvm install --lts
Alternatively, you can specify a specific version to install. For example:
Nvm install 14.18.3
Step 6:
- Use Installed Node.js Version: After Node.js is installed, NVM automatically switches to the newly installed version. You can verify the installed version by running:
Node-v
Step 7:
- Set Default Node.js Version: If you need to set a default Node.Js model to use globally, you may run:
Csharp
nvm alias default <version>
Replace <version> with the Node.js version you want to set as default.
That’s it! You’ve successfully installed Node.js using NVM on your Mac. You can now use Node.Js and NPM for your development initiatives. If you come upon any problems or have particular questions all through the setup technique, feel free to reach out to other online websites for additional help!
Trouble Shooting Tips for Issues Occur During Installation
Sometimes, problems arise during the installation procedure that prevents users from effectively installing the programs. We have given the users some advice that they can utilize to correct various errors that may arise during the installation process.
- Permission Errors: If you come across permission errors for the duration of setup, make certain that you have administrative privileges on Windows or sudo permissions on Mac. You might also want to run the installer or instructions with improved permissions.
- Firewall or Antivirus Blocks: If your firewall or antivirus software program blocks the setup procedure, briefly disable them or add exceptions for Node.Js and NPM installers.
- Incomplete Installation: If the setup seems to be incomplete or interrupted, attempt restarting your PC and running the installer again. Ensure that you have a stable internet connection at some stage in the setup manner.
- Path Configuration: After installation, if Node.js or NPM commands are not recognized in the terminal, check if the installation directories are added to your system’s PATH environment variable. On Windows, you may need to manually add the installation directory to the PATH. On Mac, NVM handles PATH configuration automatically.
- Conflicting Software: Check for any conflicting software program that can interfere with the installation system. For instance, different versions of Node.Js or NPM established for your gadget may purpose conflicts. Uninstall any conflicting software program before intending with the setup.
Key Takeaways from the Blog
- Understanding the setup technique for Node.Js and NPM on both Windows and Mac working structures.
- Learning about specific setup techniques, including the use of reputable installers or package managers like Homebrew and NVM.
- Recognizing the significance of Node.Js and NPM in the current net improvement and the way to get began with them.
- Gaining self-belief in installing and managing Node.Js and NPM on your selected working system.
- Exploring extra assets and equipment for further enhancing your improvement environment with Node.Js and NPM.
Conclusion:
We have discussed some of the most popular and efficient methods for installing NPM and Node.js in this article. Although there can be other alternative installation methods, we have selected the most suitable ones for you. You are welcome to employ the aforementioned techniques as well as any ones you come across online.
There are plenty of online resources that can walk you through the process of installing NPM and Node.JS without any problems. You can utilize their method of installing the get the proper help if you are having trouble putting the preceding steps into practice.
Frequently Asked Questions (FAQs):
1. What is the recommended way to install Node.js and npm on Windows and Mac devices?
It is strongly recommended to use a Node version manager like nvm to install Node.js and npm.
2. How can I check if Node.js and npm are already installed on my system?
To check if Node.js and npm are installed and view the installed versions, you can run the following commands: node -v for Node.js and npm -v for npm.
3. What should I do if I encounter permissions errors when running npm packages globally?
If you face permissions errors, it is advised to use a Node version manager like nvm to avoid such issues during installation.
4. Can I use a Node installer instead of a Node version manager to install Node.js and npm?
If you are unable to use a Node version manager, you can opt for a Node installer to install both Node.js and npm on your system.
5. Which versions of Node.js should I install on Windows and Mac devices?
It is recommended to install the LTS version of Node.js labeled as such when using OS X or Windows.
6. How can I verify if Node JS and NPM have been successfully installed on my Mac or Windows computer?
After installation, you can verify the installation by opening the command prompt and running node -v for Node JS and npm -v for NPM.
7. What steps are involved in installing NPM on a Mac computer?
The process involves downloading the NPM package, running the package manager, agreeing to license terms, finalizing installation settings, and completing the installation process.
8. Is there a specific package manager recommended for installing tools like node on Mac or Linux systems?
Homebrew is recommended as a package manager for OS X and Linux that simplifies the installation process for tools like node.


Pingback: Building a Node.js CLI Tool for Automating Tasks